
Builder Tips:
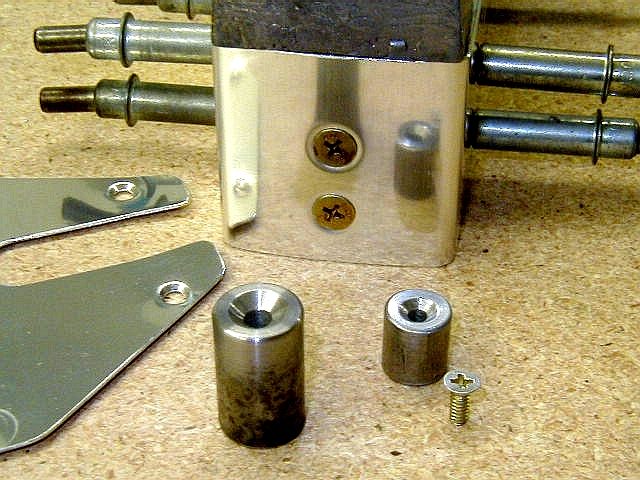
Dimple dies (limited use): You don't need to buy a dimple die set for every screw size used on you project, this can get expensive. You can make your own limited use dimple die. Shown here are two (#10 & #6) dimple dies. I made the female die from some scrap steel rod, drilled a clearance hole for the screw and machined countersinked the die. The male die is the actual screw. You can use a c-clamp or you can use your rivet squeezer to apply pressure. Apply some scotch tape to the female die for added protection against scratches.
Tight location dimpling and rivet setting: There are a few occasions (flaps, ailerons, rudder, elevators) where is very difficult to dimple the end ribs and equally difficult to set the rivets. Here are some simple, inexpensive techniques that work very well. All you need is a "pop" rivet dimple die set and a piece of scrap steel. The male dimple die needs to be modified by countersinking the back side so that the a rivet can be inserted through the male die with the rivet head flush to this side Insert a flush rivet in the male die. Choose the right length so that the rivet extends far enough so that it pilots into the female die during "assembly". Using a modified c-clamp (grind away material from the lower jaw), create the dimple. To set the rivet you need to modify a bar of steel (taper ground on one end of bar, 1/2"x1"x12" bar works well). Tape the rivet in the hole, lay the work on a back riveting plate (make sure the skin is flush to the plate). Place the modified bar as shown in the photo and carefully hit the bar with a hammer. You don't have to hit it very hard, I find 5 hits works most of the time. Notice there is a piece of cardboard placed in front of the bar to protect the rib from being scratched during this process.

SARRT (Semi-Automatic Rivet Removal Tool)